tiretek premium tire pressure gauge

Find answers to the most frequently asked customer questions about our TireTek Premium Tire Pressure Gauge here, along with Video User Guides, PDF Downloads and Troubleshooting Tips below.

If you can’t find what you are looking for, please do CONTACT US with your enquiry. We’re here to help!

Premium Gauge: COMMON QUESTIONS

Is the tire gauge housing made of metal or plastic?

The TireTek Premium Tire Pressure Gauge is built to last with a tough steel casing, solid brass movement & fittings, with a reinforced acrylic display window and rugged ‘gear-style’ surround to protect your gauge from day-to-day drops and knocks. No plastic used!

Does the chuck fit onto the tire valve without letting out air?

Yes! The 45° rotating chuck design offers the great advantage of a perfect viewing angle on the gauge, regardless of the position where tire valve is sitting. However for best results with this design we recommend using a slightly different technique to standard ‘straight’ chuck tire gauges when lining up the gauge on the tire valve stem to take a reading without air leaking.

We have found with the rotating 45° chuck design that the best technique is to hold the gauge with your thumb directly behind the chuck head, rather than the main body when pressing the gauge to the tire stem. Either using the one-hand or two-handed technique (see below). In this way you should be able to take pressure readings with much greater control and minimal to no air loss.

  TIP:  See the ‘How To: Take An Accurate Tire Pressure Reading’ user guide and video below   

Does it retain the reading after removing it from the tire?

Yes, the TireTek Premium Tire Pressure Gauge will retain the pressure reading when removed from the tire valve until the pressure release / bleed button is pressed on the side of the gauge stem. You can also take an accurate pressure reading while still on the tire valve, like a standard gauge, however this is a very useful feature to have when trying to read the dial in bad light conditions for example.

Can it be used to bleed air out from an over-inflated tire? How?

Yes! While the TireTek Premium Tire Pressure Gauge is pressed on your vehicle’s tire valve and showing a reading, press the button on the side of the gauge. This will allow you to release air to deflate or ‘bleed down’ your tire pressure. You can keep an eye on the pressure reading by periodically releasing the bleed button to check pressure, easily reducing tire pressure to the exact level desired.

  TIP:  A more detailed guide and ‘How To’ video are shown under the ‘User Guides’ section below   

Is it more accurate/reliable than a digital tire gauge at low temperatues?

Our Premium Tire Gauge is a highly accurate mechanical pressure reading instrument, integrating a fully geared, solid brass mechanism with precision bronze bourdon tube movement. Unlike traditional plunger-type gauges or modern Digital tire pressure gauges, the bourdon tube movement is not affected by changes in temperature, humidity, altitude or air stream contaminants. Our certified mechanical tire pressure gauges will perform reliably at low temperatures and do not rely on batteries to work!

What does the ANSI B40.1 Grade B standard refer to?

ANSI is the acronym for the American National Standards Institute, a non-profit organization that oversees the development of voluntary consensus standards for products in the United States.

B40.1 is the specific standard that has been issued by ANSI for pressure gauges, with dial-type pressure gauges having four grades of accuracy: A, B, C, and D.

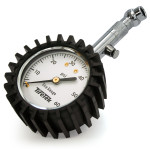
All of our TireTek tire pressure gauges meet ANSI B40.1 Grade B specifications, which is the highest accuracy standard typically used for tire pressure measurement (with ‘A’ being the most accurate and used mainly for industrial applications).

In practice the ANSI B40.1 Grade B certification means that the mechanical accuracy rating of our tire pressure gauges will be ± 2% from 25% to 75% of scale and ± 3% below 25% and above 75%. So a 60 psi range tire gauge is accurate to ± 1.2 psi from 15 to 45 psi and is calibrated to ± 1 psi at 30 psi.

Can I adjust the calibration of the gauge?

Modern calibration is performed by computers using electronically controlled mechanical adjusters to fine-tune the components. The TireTek range of modern Bourdon tube movement mechanical tire pressure gauges are precisely rolled and calibrated in this way to specific dimensions that should not require any further calibration over their lifespan.

What happens if I accidentally over-pressurize the gauge?

DON’T DO IT ! – Over-pressurization will damage your tire gauge!

This is particularly important for low-pressure tire gauges but applies to all PSI ranges. Always use the correct scale of gauge for your tire pressure, where the required pressure is ideally in the middle of the scale. If the pressure is unknown then use a higher PSI scale pressure gauge to check first and be careful with compact spare tires as these are very often set to a higher pressure!

  WARNING: over-pressurization WILL damage your tire gauge and void the Warranty   

Will it work for bike tires as well?

presta-schrader-valves

The TireTek Premium Tire Pressure Gauge will fit all vehicle tire valves and bicycle tires with the standard Schrader tire valve. If you have a high-performance road bike with a Presta type valve fitting, a set of Presta-to-Schrader valve adapters can typically be purchased for around $5.

Premium Gauge: TIPS & TROUBLESHOOTING

Firstly you should always check your vehicle’s tire pressure before driving when the tires are cold, as taking a reading on warm tires will result in both inaccurate and inconsistent tire pressure measurements.

Start by rotating the 45º chuck head on your Premium Tire Pressure Gauge to match the angle of the tire valve.

When using a 45º rotating chuck it is important not to simply push the gauge onto the valve from the base like you would with a standard straight chuck, as this can result in air loss.

Instead locate your thumb behind the head of the tire gauge chuck and push briefly, yet firmly, onto your vehicle’s tire valve to get a perfect seal every time.

This can be done using either a one-handed method, or the preferred two-handed approach, as this offers greater control.

Either read the tire pressure while the gauge is still on the valve, or if for example there is bad light, remove the gauge from the tire valve to view the pressure reading held on the display.

Finally, remember to press the bleed / reset button on the side of the tire gauge to release the pressure and ‘zero’ it back.

Deflating your tires to the exact pressure required is made easy with the Premium Tire Pressure Gauge by TireTek.

First rotate the 45º chuck head on your Premium Tire Pressure Gauge to match the angle of the tire valve, then push and hold the tire gauge onto the tire valve to view the current tire pressure.

Though not necessary, it is recommended to use a two-handed technique where possible, pushing the head of the chuck onto the tire valve with the thumb of your left hand, whilst holding the body of the gauge with your right hand, as this leaves your right thumb free to operate the bleed button whilst maintaining a good seal on the valve.

Holding the pressure gauge on the tire valve, press and hold the bleed button on the side of the tire gauge for a few seconds at a time to release air from the tire, then release the bleed button to get an accurate pressure reading.

Continue bleeding pressure in this manner until the precise tire pressure required has been attained.

Remove the gauge from the tire valve and press the bleed button once more to release the pressure and ‘zero’ the gauge back.

Sometimes the pressure reading no longer holds on the display dial when the gauge is removed from the tire valve due to dust or dirt getting on to the valve seat inside the gauge stem. This is usually transferred from the tire valve or even via air from inside the tire.

However it is usually simple to rectify by following the steps below:

  1. Hold the gauge over a suitable clean container to prevent losing any small parts, unscrew the tire gauge stem, pull out the brass check-valve plug and check the o-ring is aligned correctly.
  2. Tap out the black & white valve seat discs and the conical spring below the brass plug.
  3. Clean both discs and inside the gauge stem, then give a gentle blow down the stem while pressing the bleed button on the side to clear any hidden debris.
  4. Re-assemble with the spring going in first, wide end down. Then the white plastic disc with the black rubber valve seat disc on top.
  5. Ensure the valve seats are positioned centrally, then push the brass check-valve plug back in, screw the chuck back on to the stem and test.
  6. If this does not rectify the problem, dust may have got into the bleed button stem. As this is not accessible, a drop of lubricating oil down the bleed button stem can often solve the problem.

We ALWAYS stand by our products AND our customers, so we will of course replace your tire pressure gauge if it proves to be defective in any way, however this is very rare (in fact less than 2% of all tire gauges). So please try these troubleshooting steps first.